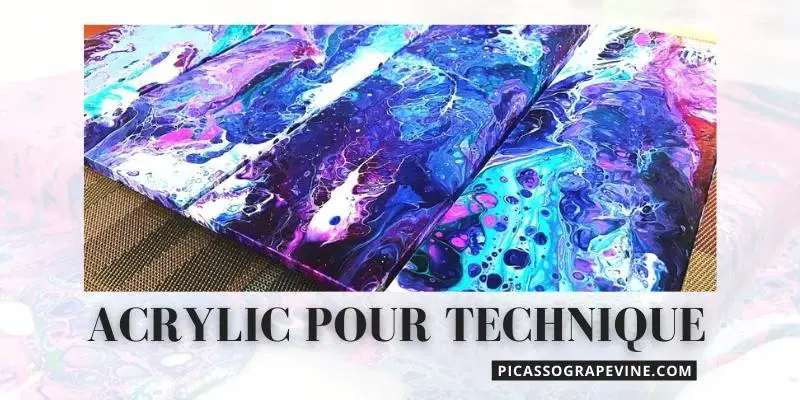
The Comprehensive Guide to Acrylic Pour Painting Techniques
Acrylic pour painting is a fluid art where artists pour acrylic paint on surfaces to create abstract artwork.
You can use acrylic painting for many different purposes like backdrops for dreamscape scenery, coasters, home decor items like picture frames or lamps (just to name a few), faux marble countertops, etc.
With so many techniques out there today, it might seem difficult at first to decide which technique you want to try.
We’ve rounded up all the current methods in this guide so that now you don’t have to!
What You’ll Need
Acrylic paint
For a more vibrant and colorful painting, use gloss or matte acrylic paints.
 Art Craft Paints for Professional Artists Kids Students Beginners & Hobby Painters, Canvas Ceramic Wood Fabric Rock Painting Art Supplies Kit")
If you want to create something with a lot of detail, choose high-quality colors like the Artist’s Loft line at Michaels Stores.
Paper Towels
 with Fast-Drying Absorbency Pockets, White, 16 Packs / Case, 250 Multifold Towels / Pack")
These will get dirty quickly, so be sure to have extras on hand! Paint can also stain them if they are not changed often enough.
Brush
A brush is used for blending and filling in large areas when it would otherwise be difficult to control the pour from an open jar.

Gesso brushes work best because their bristles do well with thicker textures, but any synthetic bristle artist’s style brush should work just fine too.
Non Stick Palette
A palette is used to mix colors.
")
Bucket or tub for water
It can be any five-gallon bucket with the lid cut down on one side, an old bathtub, etc.
The container needs to have a lip high enough that when you pour paint into it from above, it will not spill out of the bucket if tilted at some angle but low enough so that the wrist holding the pouring funnel does not drag in the wet paint.
Funnel and Pouring Jar (optional)
These are optional items, but they do make it easier than using your hand as a cup!
They also allow you more control over how much acrylic paints flow onto paper towels causing less mess overall because there’s no need to squeeze hard to get more paint out.
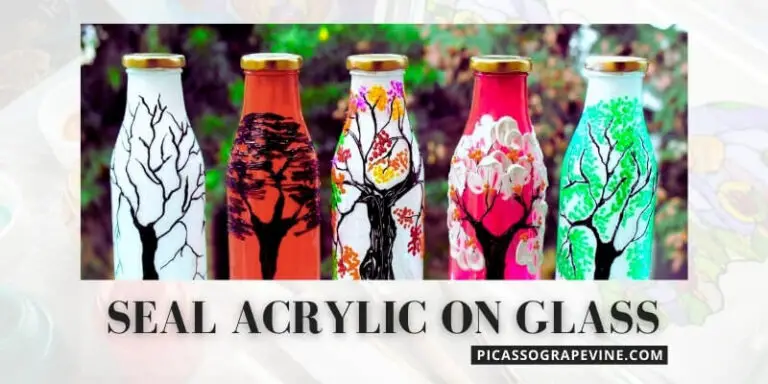
Also Read: Learn the best way to seal acrylic paint on glass with this informative article.
How To Do Clean Acrylic Pouring
The essential art of pour painting is so much more than just letting colorful paint run down the page.
The clean pour is excellent for creating color block pieces or abstract retro-inspired paintings with styles all their own.
How to do it:
- Mix your paint with a thin oil-based medium to achieve the desired consistency. It is runny and liquid, but not so much that it can’t be controlled or manipulated by brush strokes.
- Pour a little at first and carefully observe how they mix. Then, if you want more of one, add some!
- If you want it to have a more natural look, blend colors and let them flow into one another as you move across the painting surface.
- If you want sharp edges between color blocks, keep each area of color separated from other areas with distinct boundaries but without any overlap in pigment for an easy-to-read visual impact that can also be interesting when combined with complementary hues.
Clean Acrylic Pour Painting on 8 X 11 Canvas Video
How To Do Dirty Acrylic Pouring
A dirty pour is a technique where you layer colors in your cup and then, all at once, quickly pour them out onto the surface.
It can create wild patterns as well as more controlled ones, depending on how you do it.
How to do it:
- Mix each of your colors separately (paint and medium) in a small cup.
- Take one drop of paint from every color you have mixed up on an art palette or paper plate.
- Dab them all onto some clean white cardboard, then place them back down again so that they create irregular blobs next to one another without overlapping much at first glance.
- Begin mixing around with different fingers until this abstract piece is complete!
2 Liter Dirty Acrylic Pour Painting Video
How To Do Flip Cup Acrylic Pouring
A flip cup technique is when you place an upside-down glass full of liquid on your canvas.
Then either pull it off or poke holes in the top once pressure builds up inside so that more color comes out from under-neatly!
Flip cup pours a fantastic way to create beautiful, dynamic patterns and blends.
Each pour creates a different pattern dependent on the speed of pouring, the angle you hold your brush at while painting with it, how much paint you used in each flip-cup pour.
This technique can also be utilized for cells if silicone or dimethicone is added only to specific colors (it should not touch black-white metallic paints).
How to do it:
- Mix your paints in individual cups with the mediums. Add silicone or dimethicone, if you are using it, now to get a smooth finish on paper, canvas, and other surfaces.
- You might want to consider pouring your paint in a cup instead of plopping it together. Pouring will make for cleaner edges and less mess on the tabletop!
Flip Cup Acrylic Painting Technique on 16 X 20 Canvas Video
You may want to follow this step to do the flip cup technique based on the size of your surface:
Small Surface
Place the surface on top of the inverted paint cup. Next, with one hand, hold onto both objects as they are flipped over together so that it is easy to mix them up!
Large Surface
Place a small piece of cardboard or plastic over the top of your pouring cup.
Then, manipulate both the cup and smaller surface to create an outline onto your larger surface with them as well, then just make sure you have enough space for it!
Once all has been done correctly, place one edge (or any side) on whatever desired area you want to put ink there on that specific section.
Do it while also holding down whichever other sized object is still attached on its opposite end so slowly slide off from underneath this new spot where now ink will be applied into without having messy hands afterward too!
TIps:
- Once you have your cup in place on the surface, it’s time to pick how you want to remove it.
- You can either pull off or poke a few holes at the bottom of your artwork so that when pressure is relieved from inside due to removal, the paint will flow out naturally for an artistic look!
- Once your paint is on the canvas, you can manipulate it to get the desired effect! Make sure not to use too much or else it will be difficult.
- You can also change how many brushstrokes are applied per second by adjusting pressure and speed of movement with a stylus.
How To Do Swipe Acrylic Pouring Techniques
It’s done by following the process of pouring individual colors and then using your fingers or tools such as paper towels or frosting spatulas, dampened with water (or paint), following each color along its path across the canvas.
It will help create cells on top of one another in different shapes that look like they’re trying to break out from inside it!
How to do it:
- Mix the paint and medium to create your desired consistency. Let it sit for a while so that it will nicely blend.
- Once your paint has been mixed nicely, pour it to your canvas. To get the best results, be sure to take your time and not rush through any of this.
- Don’t put too much pressure on it or scrape off some of the colors or mix them up with other ones, which could result in mud-like textures.
- If you were too rough with it or put too much pressure, just dip a cloth in clean water and gently wipe down the area, so no paint is left on top of what has already been applied.
- Use a torch to light up your cells and help them pop out if you’ve added silicone or dimethicone. (OPTIONAL)
Swipe Acrylic Pouring Techniques Video – Using Sheleeart Pouring Medium
Materials:
- House Paint: Valspar Brilliant white silk
- Pouring medium: My equivalent to Sheleeart
- Cell Activator: Australian Flood Floetrol and Amsterdam Titanium White 1:1 ratio
- 3 parts Valspar wood and metal v700, interior gloss, base C
- 1 part polyurethane gloss varnish (try to get a triple thick one)
FAQ (Frequently Asked Questions)
What do you need for acrylic pouring?
1. A clean workspace
Acrylic is quite messy and will create a lot of mess. Have everything set up before you start working with the acrylic, so there’s no worrying about getting it in places difficult to reach afterward.
2. Acrylic paint
There are many different types of paint for acrylic pourings, such as metallic paints or oil paints which can give an interesting effect on surfaces other than paper.
Be sure to pick out your favorite colors!
3. Paintbrush (or applicator)
The best way to apply paint is by using a brush or some circular object like a sponge because they allow more control over how much color goes onto the surface.
For large areas, use a roller instead of trying to do it all with a paintbrush.
4. Water container
Acrylic is water-based, so you will need to have some water source on hand that the acrylic mixture won’t ruin and can hold enough liquid for your desired project.
It could either be an old large tub or bucket; try not to use anything made out of plastic because it might melt!
The best thing would probably be using a collapsible watering can since they’re usually metal which won’t react chemically with the acrylic.
5. Painters tape
The surface needs to be taped off to avoid getting paint where it doesn’t belong before painting onto paper/canvas/etc.
It also protects surfaces from accidentally being messed up during the process.
What can I use as a pouring medium?
1. Oil
Oil is excellent for transferring small quantities of beads from a container into an enclosed space because it will soak up any excess bead solution that spills out of your work area.
You can also use it to estimate how much material would fill an enclosure since some materials like silicone are only available in gallon containers and not smaller amounts.
It does leave behind residue on surfaces which requires another cleaning process afterward (i.e., washing with soap).
These properties have made this product very popular among our customers who use UV curing for their work.
2. Pourable Glue
It is a good option for transferring bead solutions, and it won’t leave behind any residue on surfaces.
Still, you’ll have to carefully pour or spoon out your beads from the container because they will not flow easily through the opening in most containers.
This product can also be used as an alternative pouring medium if time permits since it’s easy to use even with finely strung materials that are difficult to handle during transfer (e.g., seed beads).
3. Oil Blender
These products come specifically designed for oil and water mixtures, allowing them to mix smoothly without leaving much of a mess behind.
They’re usually filled up using some sort of system like graduated cylinders or measuring cups so the user can accurately measure the amount of each ingredient.
Can I make my acrylic pouring medium?
If you want to make your pouring medium, it is possible. You can use an acrylic gesso and mix in a powder pigment of the color desired.
The best thing to do would be to add a small amount at first and then gradually increase the amount until you get the shade you want.
However, many different acrylics are available on today’s market, which will work just as well if not better than making your pourable medium with paint shops quality ingredients like Liquitex or Golden Acrylic Pouring Medium products.
These already come in their liquid form for easy mixing into any type of painting project without purchasing extra materials such as oil paints, brushes, or turpentine fluid from home improvement stores.
Is acrylic pouring expensive?
Yes, it is expensive to pour acrylic. However, the price range varies depending on the thickness of the material and whether or not it has a pattern (such as swirls) inside.
The cost for pouring an average-sized slab ranges from $60-$100 per square foot without any patterns in them, with some designs that have more intricate and detailed features that will be even higher.
Curved edges can also increase the costs by up to 50%. Uncut pieces are cheaper but may require additional cuts at installation time, which increases labor expenses further.
It does not include other materials needed, such as supports, form liners, etc. Plus, there are always transportation costs to factor into your budget when hiring professionals who do this work themselves.
I am truly grateful to the owner of this site who
has shared this enormous piece of writing at here.
Hello there, just became aware of your blog through Google, and found that it’s really informative.
I will be grateful if you continue this in future. Lots of people will be benefited
from your writing. Cheers!